-28%
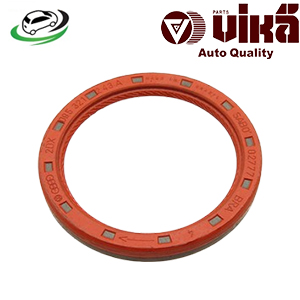
Get Oil seal for main drive shaft VW Golf III 2.0/Cabrio III 2.0/Golf III VR6 12v/Jetta III VR6 12v/Jetta III TDI 095321243A
The oil seal for the main drive shaft, also known as the front or rear main seal, plays a crucial role in maintaining the integrity and performance of an internal combustion engine. This seal prevents engine oil from leaking out of the crankcase and transmission fluid from leaking out of the gearbox, ensuring that these vital fluids remain within their respective systems. This comprehensive guide covers the function, types, common issues, signs of failure, maintenance, and replacement of the oil seal for the main drive shaft.
Function of the Oil Seal
The primary functions of the oil seal for the main drive shaft include:
- Preventing Oil Leaks: The seal prevents engine oil or transmission fluid from leaking out of the crankcase or gearbox, maintaining proper lubrication and preventing contamination of other engine components.
- Maintaining Pressure: By sealing the interface between the drive shaft and the engine or transmission, the oil seal helps maintain the correct pressure within these systems.
- Protecting Components: It prevents dust, dirt, and other contaminants from entering the engine or transmission, protecting the internal components from wear and damage.
- Ensuring Efficiency: Proper sealing helps maintain the efficiency and performance of the engine and transmission by ensuring that fluids are retained within their systems.
Types of Oil Seals
Oil seals for the main drive shaft come in various types, designed to meet specific requirements of different engines and transmissions:
- Material Composition:
- Rubber Seals: Made from high-quality rubber or elastomers, these seals offer good flexibility and resistance to oil and heat.
- Metal Seals: Often used in combination with rubber, metal seals provide added strength and durability, particularly in high-pressure applications.
- Design Features:
- Single Lip Seals: These seals have a single sealing lip and are suitable for low-pressure applications.
- Double Lip Seals: Featuring two sealing lips, these seals provide better protection against leaks and contaminants, making them ideal for high-pressure environments.
- Spring-Loaded Seals: These seals include a spring that maintains consistent pressure on the sealing lip, ensuring a tight fit and preventing leaks even under varying pressure conditions.
Importance of the Oil Seal
The oil seal for the main drive shaft is crucial for several reasons:
- Preventing Oil and Fluid Loss: By ensuring that engine oil and transmission fluid remain within their systems, the oil seal helps maintain proper lubrication, preventing overheating and damage to moving parts.
- Maintaining Cleanliness: The seal keeps contaminants out of the engine and transmission, reducing the risk of wear and damage to internal components.
- Ensuring Efficiency: Proper sealing helps maintain the efficiency and performance of the engine and transmission, contributing to better fuel economy and reduced emissions.
- Reducing Maintenance Costs: Preventing leaks and contamination can reduce the frequency and cost of maintenance and repairs.
Common Issues with Oil Seals
Several issues can affect the performance and longevity of oil seals for the main drive shaft:
- Wear and Tear: Over time, the sealing lip can wear out due to friction and exposure to heat and oil, leading to leaks.
- Aging: Rubber seals can become brittle and crack with age, especially if exposed to high temperatures and harsh conditions.
- Improper Installation: Incorrect installation can lead to misalignment or damage to the seal, causing leaks.
- Contaminants: Dirt, debris, and other contaminants can damage the sealing surface, leading to leaks and reduced effectiveness.
- Excessive Pressure: High pressure within the engine or transmission can cause the seal to fail, resulting in leaks.
Signs of a Faulty Oil Seal
Identifying signs of a faulty oil seal can help address issues before they lead to more severe problems:
- Oil Leaks: Visible oil leaks around the crankshaft or transmission area are a clear sign of a faulty oil seal. Look for oil spots under the vehicle or oil traces on the engine or transmission casing.
- Low Oil Levels: Frequent drops in engine oil or transmission fluid levels can indicate a leak caused by a faulty seal.
- Engine Overheating: Insufficient oil levels due to a leak can lead to overheating, as the engine components are not properly lubricated.
- Transmission Issues: In the case of a leaking rear main seal, you may experience transmission problems such as slipping or rough shifting.
- Noise and Vibration: Unusual noises or vibrations from the engine or transmission can be caused by insufficient lubrication due to an oil leak.
Maintenance and Prevention
Proper maintenance of the oil seal for the main drive shaft can help ensure its longevity and effectiveness:
- Regular Inspections: Check for signs of oil leaks, cracks, or other damage during routine maintenance.
- Monitor Fluid Levels: Regularly check and maintain proper engine oil and transmission fluid levels.
- Use Quality Fluids: Use high-quality engine oil and transmission fluid recommended by the manufacturer to ensure proper lubrication and protection of the seal.
- Cleanliness: Keep the engine and transmission areas clean to prevent contaminants from damaging the seal.
- Avoid Overfilling: Do not overfill the engine or transmission with oil or fluid, as excessive pressure can cause the seal to fail.
Replacement of the Oil Seal
Replacing the oil seal for the main drive shaft involves several steps, which can vary depending on the engine type and configuration:
- Preparation:
- Tools and Materials: Gather necessary tools, including a socket set, wrenches, screwdrivers, and replacement seal.
- Safety Measures: Ensure the engine is cool and the vehicle is securely supported.
- Remove Old Seal:
- Access the Seal: Depending on the vehicle, you may need to remove components such as the transmission, flywheel, or crankshaft pulley to access the seal.
- Remove Fasteners: Use appropriate tools to remove the bolts or screws securing the seal housing.
- Remove Seal: Carefully pry out the old seal, taking care not to damage the crankshaft or housing.
- Install New Seal:
- Prepare the Area: Clean the sealing surface on the crankshaft and housing to remove any debris, old sealant, or oil.
- Install New Seal: Position the new seal and press it into place using a seal driver or appropriate tool, ensuring it is seated evenly and securely.
- Reassemble Components: Reattach any components removed to access the seal, tightening bolts and screws to the manufacturer’s specifications.
- Refill Fluids:
- Refill System: Refill the engine or transmission with the recommended type and amount of oil or fluid.
- Check for Leaks: After installation, check the area around the new seal for any signs of leaks.
- Test Engine and Transmission:
- Inspect: Start the engine and let it run for a few minutes, monitoring for any unusual noises, leaks, or temperature fluctuations.
- Test Drive: Take the vehicle for a test drive to ensure the new seal is functioning properly and there are no issues with oil or fluid leaks.
Follow us on Facebook for more parts.


