-33%
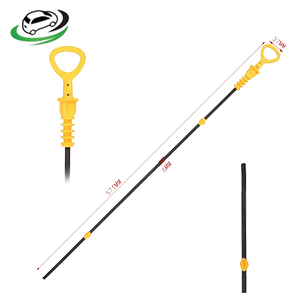
Get Engine Oil Level Gauge Dipstick AUDI A4 B5/A4 B5 Avant/A4 B6/A4 B6 Avant/A6 C5/A6 C5 Avant / VW Bora I/Golf IV 06B115611C
The engine oil level gauge dipstick is one of the simplest yet most essential tools for maintaining the health of an internal combustion engine. This small, often overlooked component plays a vital role in ensuring that the engine has the correct amount of oil, which is crucial for lubrication, cooling, and overall engine performance. This in-depth analysis explores the function, design, usage, and maintenance of the engine oil level gauge dipstick, as well as its importance in engine care.
1. The Purpose and Function of the Oil Level Gauge Dipstick
The engine oil level gauge dipstick is a slender, flat rod, usually made of metal or plastic, that allows vehicle owners and mechanics to check the oil level inside the engine. The dipstick is inserted into a tube that leads directly to the oil sump, where the engine oil is stored.
1.1. Why Checking Oil Level Is Important
Engine oil is the lifeblood of an engine. It serves several critical functions:
- Lubrication: Engine oil lubricates the moving parts inside the engine, reducing friction and preventing wear and tear.
- Cooling: By absorbing and dispersing heat, engine oil helps to regulate the engine’s temperature and prevent overheating.
- Cleaning: Engine oil helps remove contaminants from the engine, such as dirt, metal particles, and combustion byproducts, and carries them to the oil filter for removal.
- Sealing: Engine oil helps create a seal between the piston rings and cylinder walls, reducing the escape of combustion gases.
Given these crucial roles, maintaining the correct oil level is essential. Too little oil can lead to inadequate lubrication, resulting in increased friction, overheating, and potentially catastrophic engine damage. Conversely, too much oil can cause increased pressure within the engine, leading to leaks and possibly damaging seals and gaskets.
1.2. How the Dipstick Works
The dipstick is designed to measure the oil level in the engine sump. It typically has markings or notches indicating the minimum and maximum acceptable oil levels. The process of checking the oil involves:
- Insertion: The dipstick is inserted into the dipstick tube, which extends into the oil sump.
- Measurement: When withdrawn, the dipstick will have a coating of oil along its length, indicating the current oil level relative to the markings.
- Assessment: By comparing the oil level with the minimum and maximum markings, the user can determine whether more oil needs to be added or if the level is within the acceptable range.
2. Design and Structure of the Oil Level Gauge Dipstick
The dipstick is a relatively simple device, but its design is tailored to ensure accuracy, durability, and ease of use.
2.1. Material Composition
- Metal: Most traditional dipsticks are made of metal, typically steel or aluminum, which is durable and resistant to corrosion from exposure to oil and engine heat.
- Plastic: Some modern vehicles use dipsticks made from heat-resistant plastics, which are lightweight and cost-effective. However, plastic dipsticks can be less durable over time, especially in high-temperature environments.
- Handle: The dipstick typically has a brightly colored handle, often made of plastic, rubber, or a combination of materials, which makes it easy to locate and grip. The handle may also have a locking mechanism to secure the dipstick in place.
2.2. Markings and Calibration
- Min and Max Markings: The dipstick features minimum (MIN) and maximum (MAX) level indicators, which are usually stamped, notched, or painted onto the metal or plastic. These markings are calibrated to correspond to the correct oil level when the engine is filled with the specified amount of oil.
- Hatching: Some dipsticks have a hatched or crosshatched area between the MIN and MAX markings, indicating the safe operating range. Oil levels within this range are generally considered optimal.
- Color Coding: On some dipsticks, the tip may be color-coded or have a contrasting color to make it easier to read the oil level.
3. How to Use the Oil Level Gauge Dipstick
Checking the engine oil level with the dipstick is a straightforward process, but it’s important to follow the correct steps to ensure an accurate reading.
3.1. Preparing for the Check
- Park on a Level Surface: The vehicle should be parked on a level surface to ensure an accurate reading. If the car is on a slope, the oil may pool at one end of the sump, leading to an inaccurate measurement.
- Allow the Engine to Cool: It’s best to check the oil when the engine is cool or after it has been turned off for a few minutes. This allows the oil to settle in the sump and prevents burns from hot engine components.
3.2. Checking the Oil Level
- Locate the Dipstick: Open the hood and locate the dipstick, which is usually marked with a brightly colored handle.
- Remove the Dipstick: Pull the dipstick out of the tube and wipe it clean with a cloth or paper towel. This removes any oil that may have splashed onto it during engine operation.
- Reinsert the Dipstick: Fully reinsert the dipstick into the tube, making sure it goes all the way in.
- Withdraw the Dipstick: Pull the dipstick out again and hold it horizontally to read the oil level.
- Assess the Oil Level: Check where the oil film ends relative to the MIN and MAX markings. If the oil level is between these two marks, it’s within the safe range. If it’s below the MIN mark, more oil needs to be added.
3.3. Adding Oil (If Needed)
If the oil level is low, add the appropriate type and amount of oil to bring it back within the safe range:
- Choose the Correct Oil: Refer to the vehicle’s owner’s manual to determine the correct grade and type of oil.
- Add Oil Gradually: Pour oil into the oil filler cap opening in small increments, checking the dipstick after each addition until the oil level reaches the desired mark.
- Avoid Overfilling: Be careful not to overfill the engine, as this can lead to increased pressure, oil leaks, and other issues.
4. Common Issues with the Oil Level Gauge Dipstick
Despite its simple design, the oil level gauge dipstick can encounter issues that affect its accuracy and usability.
4.1. Broken or Damaged Dipstick
- Handle Breakage: The handle can break off, making it difficult or impossible to remove the dipstick from the tube. This is more common with plastic handles, which can become brittle over time.
- Bent or Deformed Dipstick: The dipstick itself can become bent or deformed, making it difficult to insert or withdraw. A bent dipstick may also give inaccurate readings.
- Worn Markings: Over time, the MIN and MAX markings can wear off or become difficult to read, especially on older vehicles or if the dipstick is frequently cleaned with harsh chemicals.
4.2. Oil Contamination
- Milky Oil: If the oil on the dipstick appears milky or foamy, it may indicate that coolant has mixed with the oil, which could be a sign of a head gasket leak or other serious engine issue.
- Dark or Dirty Oil: If the oil appears unusually dark or gritty, it may be time for an oil change. Dirty oil can indicate that the oil is no longer effectively lubricating the engine and needs to be replaced.
4.3. Inaccurate Readings
- Tilted Vehicle: Checking the oil on a slope can lead to inaccurate readings due to the oil pooling at one end of the sump.
- Hot Engine: Checking the oil immediately after turning off a hot engine can result in a false reading, as the oil may still be circulating and has not fully drained back into the sump.
5. Maintenance and Replacement
Proper maintenance of the oil level gauge dipstick ensures accurate readings and prolongs its lifespan.
5.1. Regular Cleaning
- Wipe Clean After Each Use: Always wipe the dipstick clean with a lint-free cloth or paper towel after each use. This prevents oil buildup and ensures a clear reading.
- Inspect for Damage: Regularly inspect the dipstick for any signs of damage, such as cracks, bends, or worn markings. Replace it if any issues are found.
5.2. Replacement
If the dipstick is damaged or missing, it should be replaced with a compatible part:
- OEM or Aftermarket Replacement: It’s important to use the correct replacement dipstick for your vehicle. OEM (Original Equipment Manufacturer) parts are designed to meet the specifications of your engine, but aftermarket options are also available. Ensure that the replacement dipstick is the correct length and has properly calibrated markings.
- Installation: Simply insert the new dipstick into the tube, making sure it fits snugly and provides accurate readings.
6. The Impact of the Oil Level Gauge Dipstick on Engine Health
Regular use of the oil level gauge dipstick is crucial for maintaining engine health:
- Prevents Engine Damage: By ensuring that the oil level is within the correct range, the dipstick helps prevent engine damage caused by insufficient lubrication or overheating.
- Extends Engine Life: Regular oil level checks and maintenance contribute to the longevity of the engine, reducing the likelihood of costly repairs or replacements.
- Improves Fuel Efficiency: A well-lubricated engine operates more efficiently, which can lead to improved fuel economy.
7. Advances and Innovations in Oil Level Measurement
While the traditional dipstick remains common, modern vehicles are increasingly equipped with electronic oil level sensors that offer more convenience and precision:
Follow us on Facebook for more parts.


