-21%
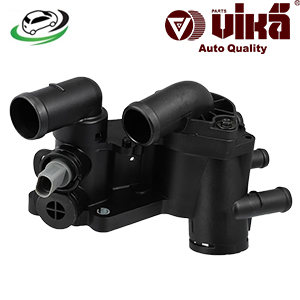
Get Thermostat Housing VW Polo Vento/ Polo Classic-IND/ Polo Classic/ Polo Lim (Stufenh Sedan)/ Polo Sedan 032121111AP
The thermostat housing is a critical component of a vehicle’s cooling system, designed to house the thermostat and facilitate the flow of coolant between the engine and the radiator. It plays a key role in regulating the engine’s operating temperature, ensuring optimal performance and preventing overheating. In this guide, we will explore the function, design, common issues, replacement process, and maintenance tips related to the thermostat housing.
1. Understanding the Thermostat Housing
a. Role of the Thermostat Housing:
The thermostat housing serves several essential functions in the cooling system:
- Encasement: It encases the thermostat, which is responsible for regulating the flow of coolant through the engine and radiator based on the engine temperature.
- Coolant Flow Management: The housing directs the flow of coolant from the engine to the radiator and vice versa. It ensures that coolant circulates properly to maintain the engine’s temperature within a specified range.
- Temperature Regulation: By housing the thermostat, the thermostat housing helps regulate the engine’s temperature, allowing the engine to warm up quickly and maintain optimal operating conditions.
b. Design and Construction:
- Material: Thermostat housings are typically made from materials such as aluminum, cast iron, or high-strength plastic. These materials are chosen for their durability, heat resistance, and ability to withstand the pressure of the coolant system.
- Shape: The housing is designed to fit snugly around the thermostat and connect to the engine and radiator through coolant hoses. Its shape is often optimized for efficient coolant flow and minimal turbulence.
- Seals and Gaskets: The thermostat housing is equipped with seals and gaskets to prevent coolant leaks and ensure a tight fit between the housing, engine, and hoses.
c. Location:
The thermostat housing is usually located on the engine block or cylinder head, near the point where the upper radiator hose connects to the engine. Its exact location can vary depending on the vehicle’s make and model.
2. Function of the Thermostat Housing
a. Regulating Engine Temperature:
The thermostat within the housing controls the flow of coolant based on the engine’s temperature. When the engine is cold, the thermostat remains closed to allow the engine to warm up quickly. As the engine reaches its optimal operating temperature, the thermostat opens to allow coolant to flow through the radiator, helping to dissipate excess heat.
b. Preventing Overheating:
By regulating the flow of coolant, the thermostat housing helps prevent engine overheating. If the coolant flow is restricted or interrupted, the engine can overheat, leading to potential damage or failure. The housing ensures that the thermostat functions correctly, maintaining the engine temperature within a safe range.
c. Ensuring Efficient Cooling:
The thermostat housing facilitates the efficient circulation of coolant between the engine and the radiator. Proper coolant flow is essential for maintaining engine performance and preventing overheating. The housing helps to direct coolant to and from the engine, ensuring that the cooling system operates effectively.
3. Common Issues with the Thermostat Housing
a. Leaks:
Leaks are one of the most common issues with thermostat housings. Leaks can occur due to:
- Worn Seals or Gaskets: Over time, seals and gaskets can deteriorate, causing coolant to leak from the housing.
- Cracks or Damage: Physical damage to the housing, such as cracks or broken components, can lead to coolant leaks.
- Loose Connections: Loose bolts or improperly fitted hoses can cause leaks around the thermostat housing.
b. Overheating:
If the thermostat housing is not functioning properly, it can lead to overheating. Possible causes include:
- Stuck Thermostat: A thermostat that is stuck in the closed position can prevent coolant from flowing to the radiator, causing the engine to overheat.
- Blocked Coolant Passage: Debris or sediment can block the coolant passages within the housing, restricting coolant flow and leading to overheating.
c. Poor Performance:
A faulty thermostat housing can lead to poor engine performance. Symptoms may include:
- Erratic Temperature Gauge Readings: Inconsistent temperature readings on the dashboard gauge can indicate a problem with the thermostat housing or thermostat.
- Reduced Fuel Efficiency: An overheating engine can lead to reduced fuel efficiency and increased emissions.
d. Corrosion:
Corrosion can affect the thermostat housing, especially if it is made of metal. Corrosion can lead to leaks, damage, and decreased performance. It is often caused by exposure to coolant, moisture, and road salt.
4. Replacing the Thermostat Housing: Step-by-Step Guide
a. Preparation:
Before beginning the replacement process, gather all necessary tools and supplies, including the new thermostat housing, seals or gaskets, a wrench or socket set, and an oil drain pan. Ensure the vehicle is parked on a level surface and the engine is cool.
b. Draining the Coolant:
- Step 1: Place an oil drain pan under the engine to catch the coolant.
- Step 2: Locate and remove the radiator drain plug or lower hose to drain the coolant. Allow the coolant to drain completely.
c. Removing the Old Thermostat Housing:
- Step 1: Locate the thermostat housing, which is usually connected to the upper radiator hose.
- Step 2: Disconnect the radiator hose from the thermostat housing by loosening the hose clamp.
- Step 3: Remove the bolts or screws securing the thermostat housing to the engine.
- Step 4: Carefully remove the old thermostat housing, being mindful of any remaining coolant that may spill out.
d. Installing the New Thermostat Housing:
- Step 1: Clean the mating surfaces on the engine and radiator hose to remove any old gasket material or debris.
- Step 2: Place the new gasket or seal onto the thermostat housing.
- Step 3: Position the new thermostat housing onto the engine, aligning it with the mounting holes.
- Step 4: Secure the housing by tightening the bolts or screws to the manufacturer’s specifications.
- Step 5: Reconnect the radiator hose and tighten the hose clamp.
e. Refilling the Coolant:
- Step 1: Refill the radiator with the appropriate type and amount of coolant, following the manufacturer’s specifications.
- Step 2: Start the engine and let it run for a few minutes, allowing the coolant to circulate through the system.
- Step 3: Check for any leaks around the thermostat housing and ensure that the coolant level is at the proper level.
f. Final Checks:
- Step 1: Inspect the area around the thermostat housing for any signs of leaks or issues.
- Step 2: Take the vehicle for a short test drive, paying attention to the engine temperature gauge and performance.
- Step 3: Recheck the coolant level and add more if necessary to reach the correct level.
5. Maintenance Tips for the Thermostat Housing
a. Regular Coolant Checks:
Monitor the coolant level and condition regularly. Low coolant levels or discolored coolant can indicate potential issues with the cooling system, including the thermostat housing.
b. Inspect for Leaks:
Periodically inspect the thermostat housing and surrounding areas for any signs of leaks or coolant puddles. Address any leaks promptly to prevent overheating and engine damage.
c. Maintain Proper Coolant Levels:
Ensure that the coolant level remains at the recommended level. Proper coolant levels are essential for maintaining engine temperature and preventing overheating.
d. Replace Seals and Gaskets:
When replacing the thermostat housing, always use new seals or gaskets to ensure a proper seal. Worn or damaged seals can lead to leaks and cooling system issues.
e. Address Corrosion:
If corrosion is present on the thermostat housing, address it promptly to prevent damage. Regularly inspect metal components for signs of corrosion and take preventive measures, such as using corrosion-resistant coatings.
Follow us on Facebook for more parts.


