-28%
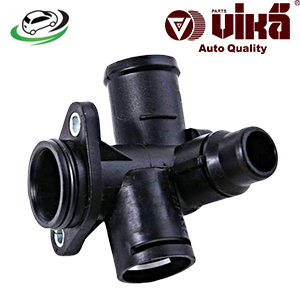
Get Coolant Hose Flange Audi B7 A4 FWD 2.0T / Audi B7 A4 Quattro 2.0T 06D121132C
The coolant hose flange is a crucial component in a vehicle’s cooling system, serving as a connection point for coolant hoses and ensuring the efficient circulation of coolant through the engine and radiator. This detailed overview will cover the design, function, importance, types, common issues, and maintenance of the coolant hose flange.
Design and Function
Design:
- Construction:
- Material: Coolant hose flanges are typically made from durable materials such as aluminum, plastic, or metal alloys. These materials are chosen for their resistance to corrosion, high temperatures, and pressure.
- Shape and Structure: The flange is designed as a flat or slightly curved plate with one or more ports or connections for the coolant hoses. It often features bolt holes or clips for securing it to the engine or other components.
- Sealing Surface: The flange includes a sealing surface that ensures a tight connection with the coolant hoses and prevents leaks. It may have an integrated gasket or O-ring to enhance sealing.
- Placement:
- Connection Points: The coolant hose flange is typically positioned at various points in the cooling system, including the engine block, thermostat housing, radiator, or water pump. Its location depends on the specific design of the vehicle’s cooling system.
- Integration with Cooling System: The flange connects coolant hoses to the engine and other cooling system components, facilitating the flow of coolant and maintaining the proper temperature.
Functionality:
- Coolant Flow Management:
- Directing Coolant: The primary function of the coolant hose flange is to direct the flow of coolant through the cooling system. It serves as a connection point for hoses that transport coolant to and from the engine, radiator, and other components.
- Maintaining Pressure: The flange helps maintain the proper pressure within the cooling system by providing a secure connection for the hoses. This ensures that the coolant circulates efficiently and prevents overheating.
- Sealing and Prevention of Leaks:
- Leak Prevention: The flange’s sealing surface and integrated gasket or O-ring prevent coolant leaks at the connection points. A secure seal is essential for maintaining the cooling system’s integrity and preventing coolant loss.
- Pressure Maintenance: By ensuring a tight connection, the flange helps maintain the required pressure within the cooling system, which is crucial for optimal engine performance and cooling efficiency.
Importance of the Coolant Hose Flange
- Cooling System Efficiency:
- Ensuring Proper Coolant Flow: The coolant hose flange plays a key role in ensuring that coolant flows smoothly through the engine and radiator. Proper flow is essential for effective heat dissipation and maintaining the engine at its optimal operating temperature.
- Preventing Overheating: By directing coolant and preventing leaks, the flange helps prevent engine overheating. Overheating can lead to severe engine damage, including warping, cracking, or failure of engine components.
- Engine Performance and Longevity:
- Maintaining Temperature: Proper cooling system operation is crucial for engine performance and longevity. The flange’s role in directing coolant and preventing leaks helps maintain the engine temperature within the recommended range.
- Preventing Damage: A well-functioning coolant hose flange helps prevent overheating and associated damage, contributing to the overall longevity and reliability of the engine.
- Preventing Coolant Loss:
- Leak Prevention: The flange’s sealing surface and gasket or O-ring prevent coolant from leaking out of the cooling system. This helps maintain the proper coolant level and prevents potential engine damage from low coolant levels.
Types of Coolant Hose Flanges
- Standard Flanges:
- Design: Standard coolant hose flanges are designed to connect coolant hoses to engine components or other parts of the cooling system. They typically feature a simple design with a single port and standard sealing surfaces.
- Application: These flanges are commonly used in various vehicles and engines where a basic connection point is required.
- Integrated Thermostat Flanges:
- Design: Some coolant hose flanges integrate the thermostat housing into the flange design. This type of flange includes a built-in thermostat and provides a connection point for the coolant hoses.
- Application: Integrated thermostat flanges are used in engines where the thermostat is part of the flange assembly, simplifying the cooling system design and installation.
- Multi-Port Flanges:
- Design: Multi-port coolant hose flanges feature multiple ports or connections for multiple hoses. This design allows for more complex cooling system configurations, including multiple coolant pathways.
- Application: Multi-port flanges are used in engines or cooling systems with multiple coolant hoses or pathways, providing flexibility in coolant routing.
Common Issues with Coolant Hose Flanges
- Leakage:
- Causes: Coolant leaks can occur due to damaged or worn gaskets, O-rings, or sealing surfaces on the flange. Over time, the flange material may degrade or become brittle, leading to leaks.
- Signs: Symptoms of leakage include visible coolant puddles or drips under the vehicle, a drop in coolant levels, or overheating of the engine.
- Cracking or Warping:
- Causes: Flanges made from plastic or aluminum can crack or warp due to exposure to high temperatures, coolant chemicals, or physical damage. Cracking can lead to coolant leaks and reduced cooling efficiency.
- Signs: Signs of cracking or warping include visible damage to the flange, coolant leaks, or difficulty in maintaining proper engine temperature.
- Corrosion:
- Causes: Metal flanges can corrode over time due to exposure to coolant chemicals, moisture, or road salts. Corrosion can lead to weakening of the flange and potential leaks.
- Signs: Symptoms of corrosion include visible rust or discoloration on the flange, leaks at the connection points, or difficulty in securing the hose connections.
- Loose Connections:
- Causes: Loose connections at the flange can occur due to improper installation, vibrations, or wear and tear. Loose connections can lead to coolant leaks and reduced cooling system efficiency.
- Signs: Signs of loose connections include coolant leaks around the flange, an unstable or wobbly flange, or difficulty in maintaining proper engine temperature.
Maintenance and Inspection
- Regular Inspections:
- Visual Checks: Regularly inspect the coolant hose flange for signs of damage, wear, or leaks. Look for visible cracks, corrosion, or deterioration of the flange material.
- Check for Leaks: Monitor the area around the flange for any signs of coolant leaks, such as puddles or drips under the vehicle. Address any leaks promptly to prevent coolant loss and engine overheating.
- Cleaning and Maintenance:
- Clean Debris: Keep the flange and surrounding area clean and free from debris. Remove any dirt, grime, or coolant residue that could affect the flange’s performance and sealing ability.
- Inspect Sealing Surfaces: Check the sealing surfaces of the flange and hoses for signs of wear or damage. Ensure that the gasket or O-ring is in good condition and properly seated.
- Replacement:
- Follow Manufacturer’s Recommendations: Replace the coolant hose flange according to the manufacturer’s recommendations or when signs of damage or wear are observed. Addressing issues promptly helps maintain the cooling system’s integrity and efficiency.
- Use Quality Parts: When replacing the flange, use high-quality parts that meet or exceed the manufacturer’s specifications. Proper installation and alignment are crucial for optimal performance.
- Proper Installation:
- Torque Specifications: Follow the manufacturer’s torque specifications when securing the flange to the engine or other components. Proper torque ensures a secure connection and prevents leaks.
- Check Alignment: Ensure that the flange is properly aligned with the coolant hoses and other components. Misalignment can lead to leaks or reduced cooling efficiency.
Replacing the Coolant Hose Flange
- Preparation:
- Gather Tools and Parts: You will need a new coolant hose flange, basic hand tools, and any required replacement parts such as gaskets or O-rings.
- Consult the Manual: Refer to the vehicle’s service manual for specific instructions and specifications related to flange replacement.
- Remove the Old Flange:
- Drain Coolant: Drain the coolant from the cooling system before removing the flange to prevent spills and ensure proper maintenance.
- Disconnect Hoses: Remove the coolant hoses connected to the old flange. Use appropriate tools to loosen and remove any clamps or fittings.
- Remove the Flange: Unscrew or unbolt the old flange from its mounting position. Carefully remove it from the engine or other components.
- Install the New Flange:
- Position the New Flange: Place the new flange in position, ensuring proper alignment with the coolant hoses and mounting holes.
- Secure the Flange: Install and tighten the bolts or screws according to the manufacturer’s specifications. Ensure that the flange is properly seated and secured.
- Reconnect Hoses:
- Attach Hoses: Reconnect the coolant hoses to the new flange, ensuring that they are properly aligned and secured with clamps or fittings.
- Check for Leaks: Refill the coolant system and check for any leaks around the new flange. Monitor the system for proper operation and cooling performance.
- Test the System:
- Run the Engine: Start the engine and allow it to reach operating temperature. Monitor the cooling system for proper performance and check for any signs of leaks or issues.
- Check Coolant Levels: Verify that the coolant level is within the recommended range and top up if necessary. Ensure that the cooling system is functioning correctly.
Follow us on Facebook for more parts.


