-35%
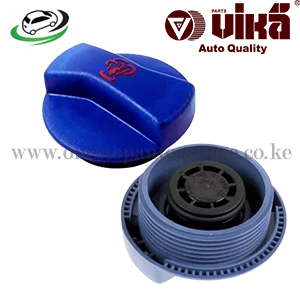
Get Expansion Tank Cap Audi B5 A4/B5 S4/C5 A6/C5 Allroad/C5 S6/Q7 3.0T/TT MKI / VW Golf IV/Jetta IV/Jetta IV GLI/Passat B5/R32 MKIV 1J0121321B
The expansion tank cap, often overlooked, is a critical component of a vehicle’s cooling system. Its role extends beyond simply covering the expansion tank; it plays a crucial part in maintaining the pressure and efficiency of the engine’s cooling system. Here’s an in-depth look at the expansion tank cap, its function, types, common issues, maintenance, and replacement.
Function of the Expansion Tank Cap
The expansion tank cap, also known as the coolant reservoir cap, serves several essential functions:
- Pressure Regulation: The cap maintains the proper pressure within the cooling system. By doing so, it helps increase the boiling point of the coolant, allowing the engine to operate at higher temperatures without overheating.
- Pressure Relief: When the pressure in the cooling system exceeds a specified limit, usually between 13 to 16 psi (pounds per square inch), the cap releases the excess pressure to prevent damage to the system. This is done through a pressure relief valve integrated into the cap.
- Vacuum Regulation: As the engine cools down and the coolant contracts, a vacuum is created. The cap allows coolant to return from the overflow tank to the radiator, preventing air from entering the system.
- Sealing: The cap provides a tight seal for the expansion tank, preventing coolant from spilling out and contaminants from entering the system.
Types of Expansion Tank Caps
Expansion tank caps come in various designs, but the most common types are:
- Standard Caps: These are simple caps that screw onto the expansion tank. They include a pressure relief valve to manage the system pressure.
- Recovery Caps: These caps work with a coolant recovery system, allowing coolant to flow back and forth between the expansion tank and the radiator as the engine heats up and cools down.
- Vented Caps: Vented caps include an additional valve that allows air to escape from the system, preventing the formation of air pockets.
Importance of the Expansion Tank Cap
The expansion tank cap is vital for several reasons:
- Prevents Overheating: By maintaining the correct pressure, the cap ensures the coolant’s boiling point is high enough to handle the engine’s operating temperature.
- Protects the Cooling System: The cap prevents excessive pressure that can cause hoses to burst or damage other components of the cooling system.
- Ensures Efficient Cooling: Proper pressure and vacuum regulation help maintain efficient coolant flow, ensuring the engine remains at an optimal temperature.
- Prevents Contamination: A well-sealed cap keeps debris and contaminants out of the coolant, maintaining the fluid’s effectiveness and protecting the engine.
Common Issues with Expansion Tank Caps
Over time, expansion tank caps can develop issues that affect their performance:
- Wear and Tear: Continuous exposure to high temperatures and pressure can cause the cap’s seals and valves to wear out, reducing its effectiveness.
- Pressure Valve Failure: If the pressure relief valve fails, it can lead to excessive pressure buildup or inadequate pressure in the cooling system, causing overheating or coolant loss.
- Seal Damage: The gasket or seal on the cap can become brittle or damaged, leading to leaks and contamination.
- Physical Damage: Caps can crack or become damaged due to mishandling or impact, compromising their ability to maintain pressure and seal the system.
Signs of a Failing Expansion Tank Cap
Recognizing the signs of a failing expansion tank cap is crucial for timely intervention:
- Coolant Leaks: Visible coolant leaks around the cap or under the vehicle can indicate a faulty cap.
- Overheating: Frequent overheating or fluctuating engine temperatures can be a sign of a pressure regulation issue caused by a failing cap.
- Low Coolant Levels: If you find yourself frequently topping off the coolant, it could be due to a leaking or malfunctioning cap.
- Collapsed Hoses: A faulty cap can create a vacuum in the cooling system, causing hoses to collapse.
- Steam or Hissing Noises: Steam or hissing sounds from the cap area can indicate a pressure release issue.
Maintenance and Prevention
Regular maintenance of the expansion tank cap is essential to ensure its proper function:
- Regular Inspections: Check the cap for signs of wear, cracks, or damage during routine maintenance.
- Clean the Cap and Tank: Ensure the cap and the tank’s sealing surface are clean to prevent debris from affecting the seal.
- Replace as Needed: If the cap shows signs of wear or damage, replace it promptly. Most manufacturers recommend replacing the cap every 2-3 years or as specified in the vehicle’s maintenance schedule.
Replacement of the Expansion Tank Cap
Replacing the expansion tank cap is a straightforward process that can be done with minimal tools and time:
- Identify the Cap: Locate the expansion tank cap, usually found near the top of the engine bay.
- Cool the Engine: Ensure the engine is cool before attempting to remove the cap to prevent burns from hot coolant or steam.
- Remove the Old Cap: Twist the old cap counterclockwise to remove it. Inspect the cap and the sealing surface for any damage or debris.
- Install the New Cap: Place the new cap on the expansion tank and twist it clockwise until it is securely in place.
- Check Coolant Levels: After installing the new cap, check the coolant levels and top off if necessary.
- Test Drive: Start the engine and let it run for a few minutes. Monitor the temperature gauge and check for any leaks or unusual noises.
Follow us on Facebook for more parts.


