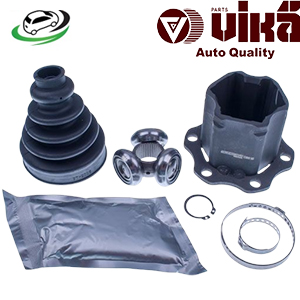
Get Front Inner C/V Joint repair Kit Audi A7 3.0 TDI/ B8 RS5/ B8 S4/ B8 S5/ B8 SQ5/ C7 A6/ Q5 4H0498103A
The constant velocity (C/V) joint is a critical component in front-wheel-drive vehicles, as well as many rear-wheel-drive and all-wheel-drive systems. The C/V joint allows the drive shaft to transmit power from the transmission to the wheels at a constant speed, regardless of the angle of the drive shaft. Over time, C/V joints can wear out or become damaged, leading to the need for repairs. A C/V joint repair kit offers a comprehensive solution to address these issues, providing all the necessary components to restore the joint’s functionality. In this guide, we will explore the components of a C/V joint repair kit, the signs of a failing C/V joint, the benefits of using a repair kit, and a step-by-step overview of the repair process.
1. Understanding the C/V Joint
a. Role of the C/V Joint: The C/V joint is designed to transmit torque from the transmission to the drive wheels while accommodating the up-and-down motion of the suspension and the steering angle of the front wheels. This flexibility is essential for smooth and efficient power delivery, especially during cornering and when driving over uneven terrain.
b. Types of C/V Joints:
- Rzeppa Joint: This is the most common type of C/V joint, featuring six steel balls that move within a grooved housing. It allows for a wide range of motion and is typically found in the outer C/V joints of front-wheel-drive vehicles.
- Tripod Joint: Typically used in the inner C/V joints, the tripod joint consists of three bearings that slide within a cup-shaped housing. It provides flexibility primarily in the axial direction, accommodating changes in the drive shaft length as the suspension moves.
- Double Offset Joint: Less common but used in some applications, this joint combines features of both Rzeppa and tripod joints to offer a balance of flexibility and strength.
2. Signs of a Failing C/V Joint
a. Clicking or Popping Noises: One of the most common symptoms of a failing outer C/V joint is a clicking or popping noise when turning, especially at low speeds. This noise occurs because the joint’s internal components are worn, causing them to move out of alignment during turns.
b. Grease Leaks: The C/V joint is enclosed in a rubber boot filled with grease, which lubricates the joint and protects it from dirt and moisture. If the boot becomes torn or damaged, grease can leak out, leaving the joint exposed to the elements. A visible grease leak around the wheel or along the drive shaft is a clear sign that the C/V joint may be compromised.
c. Vibration or Shuddering: A worn or damaged C/V joint can cause the vehicle to vibrate or shudder, particularly during acceleration or when driving at high speeds. This occurs because the joint is no longer able to maintain a consistent speed as it rotates, leading to uneven power delivery.
d. Clunking or Knocking Sounds: In some cases, a failing C/V joint may produce a clunking or knocking sound, especially when shifting gears or changing from drive to reverse. This indicates that the joint is loose or that its internal components are significantly worn.
e. Loss of Vehicle Control: In extreme cases, a severely damaged C/V joint can lead to a loss of control, as the joint may fail to transmit power to the wheels effectively. This can result in the vehicle pulling to one side, or even a complete loss of drive to the affected wheel.
3. Components of a C/V Joint Repair Kit
a. C/V Joint: The repair kit typically includes a new C/V joint, which replaces the worn or damaged joint. This component is usually pre-lubricated and ready for installation.
b. C/V Boot: The C/V boot is a crucial part of the repair kit, as it protects the new joint from dirt, moisture, and other contaminants. The boot is typically made from durable rubber or thermoplastic material and is designed to fit snugly over the joint.
c. Grease: The repair kit includes high-quality grease, which is used to lubricate the C/V joint during installation. Proper lubrication is essential for the joint’s longevity and smooth operation.
d. Clamps and Clips: To secure the C/V boot in place, the kit provides metal clamps or clips. These are used to fasten the boot to the drive shaft and the joint, ensuring that it remains sealed and protected.
e. Retaining Ring: Some repair kits include a retaining ring, which is used to secure the C/V joint to the drive shaft. This small but essential component helps to keep the joint in place, preventing it from slipping or moving out of position.
f. Axle Nut: In some cases, the repair kit may also include a new axle nut, which is used to secure the drive shaft to the wheel hub. This component is typically torqued to a specific specification during installation to ensure a secure fit.
4. Benefits of Using a C/V Joint Repair Kit
a. Cost-Effective Solution: Repairing a C/V joint using a repair kit is often more cost-effective than replacing the entire drive shaft assembly. The kit provides all the necessary components to restore the joint’s functionality, saving money on parts and labor.
b. Extended Vehicle Life: By addressing the issue of a failing C/V joint promptly, you can extend the life of your vehicle. The new joint and boot will restore smooth power delivery and protect the drive shaft from further damage.
c. Improved Vehicle Performance: A properly functioning C/V joint is essential for smooth acceleration, cornering, and overall vehicle performance. By repairing the joint, you can eliminate noise, vibrations, and other symptoms of a failing joint, resulting in a smoother and more comfortable ride.
d. Environmental Protection: Repairing a C/V joint rather than replacing the entire drive shaft assembly reduces waste and conserves resources. The repair kit allows you to replace only the worn components, minimizing the environmental impact of the repair.
e. Comprehensive Solution: The C/V joint repair kit provides all the necessary components in one package, ensuring that you have everything you need for a successful repair. This convenience saves time and reduces the risk of missing or incompatible parts.
5. C/V Joint Repair Process
a. Preparation: Before starting the repair, gather all the necessary tools and ensure that the vehicle is safely lifted and supported on jack stands. It’s also a good idea to consult the vehicle’s service manual for specific instructions and torque specifications.
b. Removing the Old C/V Joint:
- Step 1: Remove the wheel and tire to access the drive shaft.
- Step 2: Loosen and remove the axle nut, which secures the drive shaft to the wheel hub.
- Step 3: Disconnect the drive shaft from the wheel hub by carefully pushing it inward. In some cases, it may be necessary to use a puller tool to separate the joint from the hub.
- Step 4: Once the drive shaft is free, remove the damaged C/V boot by cutting the clamps or clips. Slide the old boot off the shaft.
- Step 5: Use a retaining ring pliers to remove the retaining ring (if applicable) and slide the old C/V joint off the drive shaft.
c. Installing the New C/V Joint:
- Step 1: Clean the drive shaft and remove any old grease or debris.
- Step 2: Apply the new grease provided in the repair kit to the inside of the new C/V joint.
- Step 3: Slide the new C/V joint onto the drive shaft, ensuring that it is properly aligned and seated. If a retaining ring is included, install it to secure the joint in place.
- Step 4: Slide the new C/V boot over the joint and onto the drive shaft. Position the boot so that it covers the joint completely.
d. Securing the C/V Boot:
- Step 1: Use the metal clamps or clips provided in the kit to secure the C/V boot in place. Tighten the clamps to ensure a snug fit, but be careful not to over-tighten, as this can damage the boot.
- Step 2: Ensure that the boot is properly sealed and that there are no gaps or leaks.
e. Reassembling the Drive Shaft:
- Step 1: Reconnect the drive shaft to the wheel hub and install the axle nut. Torque the axle nut to the manufacturer’s specifications.
- Step 2: Reinstall the wheel and tire, and lower the vehicle to the ground.
f. Final Checks:
- Step 1: Start the vehicle and take it for a test drive to ensure that the repair was successful. Listen for any unusual noises and check for smooth acceleration and cornering.
- Step 2: After the test drive, inspect the C/V boot and joint for any signs of leaks or issues. Make any necessary adjustments if needed.
Follow us on Facebook for more parts.


