-17%
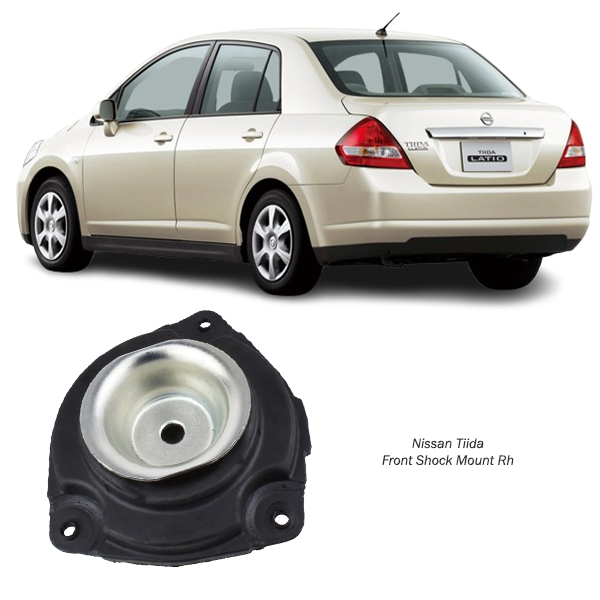
Get Nissan Tiida C11 Front Shock Mount RH 54320-1FE0A in Kenya
The front shock mount (RH), also referred to as the front right shock absorber mount, is a critical part of a vehicle’s suspension system. Positioned on the front right side of the car, this component connects the shock absorber to the vehicle chassis. It plays a significant role in absorbing road vibrations, maintaining ride comfort, and ensuring optimal handling. This guide explores its purpose, benefits, signs of wear, maintenance tips, and replacement process.
What is a Front Shock Mount?
A shock mount is a component designed to hold the top of the shock absorber in place while isolating vibrations and ensuring smooth suspension movement. It features:
- Metal Frame: Provides a rigid structure to secure the shock absorber.
- Rubber Insulator: Cushions vibrations, reduces noise, and absorbs shocks from uneven road surfaces.
- Bearing Assembly (in some mounts): Enables rotational movement for the strut assembly in vehicles with MacPherson strut suspension.
On the right-hand (RH) side, the shock mount must handle the stresses associated with steering, braking, and uneven road conditions on that side of the vehicle.
How Does a Front Shock Mount Work?
The shock mount acts as an interface between the shock absorber and the vehicle’s body. When the suspension compresses or rebounds, the shock absorber dampens the motion to provide stability. The shock mount ensures this energy transfer occurs smoothly by:
- Reducing vibrations and noise transmitted to the cabin.
- Supporting the weight of the suspension system and vehicle body.
- Allowing rotational movement (if equipped with a bearing) to aid steering.
Functions of the Front Shock Mount (RH)
- Vibration Isolation
The rubber component in the mount absorbs vibrations from the road, ensuring minimal impact is felt inside the vehicle cabin. - Structural Support
The mount anchors the shock absorber securely, allowing it to function effectively under varying load conditions. - Steering Assistance
For vehicles with MacPherson struts, the mount’s bearing helps the suspension and steering system move in unison. - Noise Reduction
By isolating metal-on-metal contact, the shock mount minimizes clunking or rattling noises.
Benefits of a Front Shock Mount (RH)
- Improved Ride Comfort
A properly functioning shock mount absorbs road impacts, ensuring a smoother ride. - Enhanced Handling
By maintaining alignment and stability, the mount contributes to responsive steering and cornering. - Reduced Wear on Suspension
A shock mount cushions the suspension system, preventing premature wear on other components. - Quieter Operation
It minimizes vibrations and noise, resulting in a quieter driving experience. - Increased Safety
A stable and well-functioning shock mount ensures optimal suspension performance, reducing the risk of accidents.
Signs of a Failing Front Shock Mount (RH)
- Unusual Noises
A worn shock mount may produce clunking, squeaking, or rattling sounds, especially during steering or when driving over bumps. - Excessive Vibrations
If the rubber insulator is damaged, vibrations from the road are transmitted to the cabin. - Uneven Tire Wear
A failing shock mount can disrupt suspension alignment, causing irregular tire wear. - Poor Handling
A damaged mount may lead to decreased steering responsiveness and stability during cornering. - Visible Damage
Cracks, tears, or deformation in the rubber component are clear signs of wear. - Steering Issues
In MacPherson strut systems, a faulty mount bearing can cause stiff or noisy steering.
Causes of Shock Mount Failure
- Wear and Tear
Constant exposure to road vibrations, extreme temperatures, and vehicle load can degrade the mount over time. - Harsh Driving Conditions
Driving on rough roads, potholes, or off-road terrain accelerates wear on the shock mount. - Improper Installation
Incorrect alignment or inadequate torque during installation can lead to premature failure. - Poor Quality Parts
Using substandard materials can result in reduced durability and performance.
Maintenance Tips for Front Shock Mounts
- Regular Inspection
Include shock mounts in your vehicle’s routine maintenance. Look for visible signs of damage, wear, or rust. - Monitor Suspension Performance
Pay attention to unusual noises or handling issues and address them promptly. - Check Wheel Alignment
Misaligned wheels can put extra stress on shock mounts, leading to faster wear. - Replace in Pairs
When replacing the front right shock mount, consider replacing the left one as well to maintain balance. - Use Quality Parts
Opt for high-quality shock mounts from reputable brands to ensure durability. - Drive Cautiously
Avoid driving over potholes or rough terrain at high speeds to reduce stress on the suspension system.
Replacement of Front Shock Mount (RH)
Replacing a shock mount is a technical process that requires precision. Here’s a step-by-step overview:
- Raise the Vehicle
Use a jack to lift the front right side of the vehicle and secure it with jack stands. - Remove the Wheel
Detach the front right wheel to access the suspension system. - Detach the Strut Assembly
Remove the bolts connecting the shock absorber to the chassis and lower control arm. Carefully take out the entire strut assembly. - Disassemble the Strut
Use a spring compressor to relieve tension from the coil spring. Remove the top nut and separate the shock mount from the strut. - Inspect Components
Check the shock absorber, coil spring, and other suspension parts for wear. Replace any damaged components. - Install the New Mount
Position the new shock mount on top of the strut assembly and secure it with the top nut. - Reassemble the Suspension
Reattach the strut assembly to the chassis and lower control arm. Ensure all bolts are tightened to the manufacturer’s specifications. - Reinstall the Wheel
Mount the wheel back onto the hub and tighten the lug nuts. - Test Drive
After lowering the vehicle, take it for a test drive to ensure the new mount is functioning correctly.
When to Replace a Front Shock Mount (RH)
Shock mounts typically last between 50,000 and 100,000 miles, depending on driving conditions and maintenance. Replace the mount if you notice:
- Persistent noises or vibrations.
- Significant wear or damage during inspections.
- Reduced handling or steering issues.
Cost of Replacement
The cost of a front shock mount varies based on the vehicle make, model, and part quality. Labor costs may also differ depending on the complexity of the suspension system. On average, replacement is relatively affordable, especially when done promptly.
Conclusion
The front shock mount (RH) is a crucial component for maintaining ride comfort, stability, and safety. Regular inspection and timely replacement can prevent more significant suspension issues and enhance your vehicle’s performance. By understanding its function and importance, you can ensure a smoother and safer driving experience.
Follow us on Facebook for more parts.


