-14%
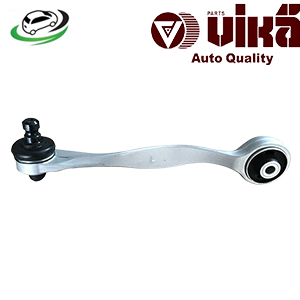
Get Front Upper Left Auto Suspension Control Arm Volkswagen Passat 1.8L/2.8L V6/Wagon 1.8L/2.8L V6 4D0407509G
The auto suspension control arm is a pivotal component of a vehicle’s suspension system, providing stability and control while enhancing ride comfort. This comprehensive overview will delve into the design, function, importance, types, common issues, and maintenance of suspension control arms.
Design and Function
Design:
- Construction:
- Material: Control arms are typically made from high-strength materials such as steel, aluminum, or composite materials. Steel offers durability and cost-effectiveness, while aluminum provides a lighter weight and better performance.
- Shape and Structure: The control arm often has an L-shaped or A-shaped design, consisting of a horizontal arm and a vertical leg. This design allows for mounting points that connect the suspension components to the vehicle’s frame or chassis.
- Bushings and Ball Joints: The control arm features bushings or ball joints at its attachment points. Bushings are usually made from rubber or polyurethane and provide a cushioning effect, while ball joints allow for pivoting and rotational movement.
- Placement:
- Connection Points: The control arm connects the vehicle’s chassis or frame to the wheel hub or spindle. It is mounted at two points: one at the chassis, often referred to as the upper or lower control arm, and one at the wheel hub.
- Integration with Suspension System: The control arm is integral to the suspension system, working in conjunction with other components such as struts, shocks, and springs to provide a smooth and controlled ride.
Functionality:
- Wheel Alignment and Control:
- Wheel Positioning: The control arm helps maintain the proper alignment of the wheels relative to the vehicle’s frame and road surface. It plays a critical role in controlling wheel angles, including camber and caster.
- Handling and Stability: By maintaining correct wheel alignment, the control arm contributes to vehicle stability, handling, and overall driving dynamics. Proper alignment ensures that the vehicle handles predictably and remains stable during cornering and braking.
- Ride Comfort and Shock Absorption:
- Damping Vibrations: The control arm, along with its bushings and ball joints, helps absorb and dampen road vibrations and shocks. This improves ride comfort by reducing the amount of road noise and harshness transmitted to the vehicle’s interior.
- Supporting Suspension Components: The control arm supports and distributes the load of the suspension components, allowing the wheels to move up and down independently while maintaining the vehicle’s stability.
Importance of the Suspension Control Arm
- Vehicle Handling and Safety:
- Precise Handling: The control arm ensures that the wheels maintain proper alignment, which is essential for precise handling and steering control. Accurate wheel positioning helps the vehicle respond predictably to driver inputs.
- Safety: A well-functioning control arm is crucial for vehicle safety. Proper alignment and handling reduce the risk of steering issues, such as pulling to one side or excessive play in the steering wheel, which can compromise safety.
- Ride Quality and Comfort:
- Smooth Ride: The control arm’s ability to absorb shocks and vibrations contributes to a smoother and more comfortable ride. It minimizes the impact of road irregularities on the vehicle’s occupants, enhancing overall driving comfort.
- Reduced Wear: By maintaining proper alignment and absorbing vibrations, the control arm helps reduce wear on other suspension components and tires, extending their lifespan.
- Suspension System Integrity:
- Component Support: The control arm plays a key role in supporting the suspension system, including struts, shocks, and springs. It ensures that these components function correctly and contribute to the vehicle’s overall performance.
- Alignment Maintenance: The control arm helps maintain proper alignment settings, which are essential for ensuring that the suspension system operates efficiently and that the vehicle remains stable on the road.
Types of Suspension Control Arms
- Upper Control Arms:
- Design: Upper control arms are positioned above the wheel hub and connect the upper part of the suspension to the vehicle’s frame or chassis. They typically have a shorter length compared to lower control arms.
- Function: The upper control arm helps control the camber angle of the wheels and supports the suspension components in the upper part of the wheel assembly.
- Lower Control Arms:
- Design: Lower control arms are located below the wheel hub and connect the lower part of the suspension to the vehicle’s frame or chassis. They are generally longer than upper control arms.
- Function: The lower control arm supports the majority of the vehicle’s weight and helps control the caster and camber angles. It also plays a significant role in shock absorption and ride comfort.
- Dual Control Arms:
- Design: Some vehicles use a dual control arm setup, which includes both upper and lower control arms. This design provides enhanced control over wheel alignment and suspension movement.
- Function: Dual control arms offer greater flexibility and precision in managing wheel angles and suspension geometry, contributing to improved handling and ride quality.
Common Issues with Suspension Control Arms
- Worn Bushings:
- Causes: Rubber or polyurethane bushings in the control arm can wear out due to age, exposure to road conditions, and lack of maintenance. Worn bushings can lead to increased play and reduced ride quality.
- Signs: Symptoms of worn bushings include clunking or knocking noises when driving over bumps, increased vibration or noise in the cabin, and a loose or unstable feeling in the steering.
- Failed Ball Joints:
- Causes: Ball joints can fail due to wear and tear, lack of lubrication, or exposure to contaminants. A failed ball joint can lead to a loss of steering control and alignment issues.
- Signs: Symptoms of a failed ball joint include clunking or popping noises when turning, excessive play in the steering wheel, and uneven tire wear.
- Bent or Damaged Control Arms:
- Causes: Control arms can become bent or damaged due to impacts, such as hitting a pothole or curb. Physical damage can affect the alignment and handling of the vehicle.
- Signs: Signs of bent or damaged control arms include abnormal handling or steering behavior, noticeable changes in ride quality, and visible damage to the control arm.
- Alignment Issues:
- Causes: Misalignment of the control arm can occur due to wear, damage, or improper installation. Misalignment can lead to handling issues and increased tire wear.
- Signs: Symptoms of alignment issues include uneven tire wear, a steering wheel that is off-center, and difficulty in maintaining a straight line while driving.
Maintenance and Inspection
- Regular Inspections:
- Visual Checks: Regularly inspect the control arms, bushings, and ball joints for signs of wear or damage. Look for visible cracks, tears, or signs of deterioration in the components.
- Check for Noise: Pay attention to any unusual noises, such as clunking or rattling sounds, when driving over bumps or turning. These noises may indicate issues with the control arm or related components.
- Alignment Checks:
- Monitor Alignment: Regularly check the vehicle’s alignment and suspension geometry. Ensure that the control arms and other suspension components are properly aligned to maintain optimal handling and performance.
- Professional Alignment: Have a professional alignment performed if you notice signs of misalignment or handling issues. Proper alignment helps ensure that the suspension system functions correctly and that the vehicle remains stable on the road.
- Lubrication and Cleaning:
- Lubricate Moving Parts: If applicable, ensure that the ball joints and other moving parts of the control arm are properly lubricated. Follow the manufacturer’s recommendations for lubrication intervals and types of lubricant.
- Clean Debris: Keep the control arms and surrounding areas clean and free from debris. Remove any dirt or contaminants that could affect the performance and longevity of the components.
- Replacement:
- Follow Manufacturer’s Recommendations: Replace control arms according to the manufacturer’s recommendations or when signs of wear or damage are observed. Addressing issues promptly helps maintain the vehicle’s handling and safety.
- Use Quality Parts: When replacing control arms, use high-quality parts that meet or exceed the manufacturer’s specifications. Proper installation and alignment are crucial for optimal performance.
Replacing the Suspension Control Arm
- Preparation:
- Gather Tools and Parts: You will need a new control arm, basic hand tools, and any required replacement parts such as bushings or ball joints.
- Consult the Manual: Refer to the vehicle’s service manual for specific instructions and specifications related to control arm replacement.
- Remove the Old Control Arm:
- Lift the Vehicle: Safely lift and support the vehicle using a jack and jack stands to access the suspension components.
- Disconnect Components: Remove any components connected to the control arm, such as the wheel hub, strut, or shock absorber. Use appropriate tools to disconnect the control arm from its mounting points.
- Remove the Control Arm: Unscrew or unbolt the old control arm from its mounting position. Carefully remove it from the vehicle.
- Install the New Control Arm:
- Position the New Control Arm: Place the new control arm in position, ensuring proper alignment with the mounting points and other suspension components.
- Secure the Control Arm: Install and tighten the bolts or screws according to the manufacturer’s specifications. Ensure that the control arm is properly seated and secured.
- Reconnect Components:
- Attach Components: Reconnect any components that were removed during the replacement process, such as the wheel hub, strut, or shock absorber. Ensure that all connections are properly tightened and secured.
- Check for Alignment: Perform a wheel alignment to ensure that the new control arm is properly aligned and that the vehicle’s handling and stability are restored.
- Test the System:
- Run the Vehicle: Start the vehicle and test the suspension system for proper operation. Monitor for any signs of issues, such as abnormal handling or noise.
- Check for Leaks: Verify that there are no leaks or loose connections around the control arm and related components. Ensure that the suspension system is functioning correctly.
Follow us on Facebook for more parts.


