-38%
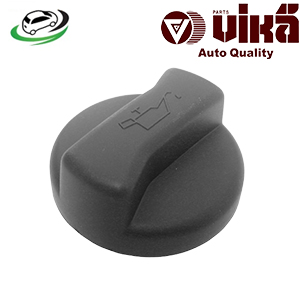
Get Oil Filler Cap Audi A4 B5/A3 8L1/A6 C4/A8 4D2/TT 8N3/TT 8N9 / VW Bora 1J2/Golf MKI/Golf MKII/Golf MKIV/Passat 3A2/Passat 3B2 026103485A
The oil filler cap is a seemingly simple yet crucial component of a vehicle’s engine. It covers the oil filler neck where motor oil is added to the engine, ensuring the proper functioning and longevity of the engine. This guide provides a detailed look at the oil filler cap, including its function, design, common issues, maintenance, and replacement.
Function of the Oil Filler Cap
The primary function of the oil filler cap is to seal the oil filler neck, preventing contamination and ensuring that the engine oil remains clean and at the correct level. Key functions include:
- Sealing: The cap securely closes the oil filler neck, protecting the engine from dirt, debris, and moisture that could contaminate the oil.
- Preventing Leakage: It prevents the engine oil from leaking out of the oil filler neck, maintaining proper oil levels and preventing potential engine damage.
- Maintaining Pressure: Many oil filler caps are designed to maintain the correct pressure within the engine’s crankcase, ensuring proper oil circulation and engine performance.
- Ease of Access: It provides an access point for adding or checking engine oil, making routine maintenance more convenient.
Design and Components
The oil filler cap typically consists of several components designed to ensure a secure seal and proper function:
- Cap Body: The main part of the cap, often made from metal or durable plastic, fits onto the oil filler neck.
- Gasket or Seal: A rubber or neoprene gasket inside the cap creates a tight seal between the cap and the filler neck, preventing leaks and contamination.
- Ventilation Mechanism: Some caps include a built-in ventilation mechanism or pressure relief valve to regulate the pressure within the crankcase.
- Locking Mechanism: Certain oil filler caps have a locking mechanism to prevent accidental removal and ensure the cap stays securely in place.
Importance of the Oil Filler Cap
The oil filler cap is vital for several reasons:
- Engine Protection: By keeping contaminants out, it helps protect the engine oil and ensures that the oil can effectively lubricate and protect engine components.
- Preventing Leaks: A properly sealed cap prevents oil leaks, which could lead to low oil levels, engine damage, or even engine failure.
- Maintaining Pressure: The cap helps maintain the proper pressure within the engine, ensuring optimal performance and reducing the risk of oil-related issues.
- Convenience: It provides easy access for adding or checking engine oil, simplifying routine maintenance tasks.
Common Issues with Oil Filler Caps
Several issues can arise with oil filler caps, affecting their performance and the engine’s overall health:
- Wear and Tear: Over time, the gasket or seal inside the cap can wear out or become damaged, leading to leaks or reduced sealing effectiveness.
- Cracking or Breaking: The cap itself can crack or break due to exposure to heat, oil, and vibration, compromising its ability to seal properly.
- Contamination: Dirt, debris, or moisture can enter the engine through a damaged or improperly sealed cap, contaminating the oil.
- Incorrect Fit: Using an incorrect or poorly designed cap can lead to improper sealing, leaks, or issues with maintaining engine pressure.
Signs of a Faulty Oil Filler Cap
Identifying signs of a faulty oil filler cap can help address issues before they lead to more severe problems:
- Oil Leaks: If you notice oil pooling around the oil filler neck or under the vehicle, it may indicate a problem with the oil filler cap.
- Check Engine Light: In some cases, a faulty oil filler cap may trigger the check engine light on the dashboard.
- Unusual Noises: Unusual engine noises, such as ticking or knocking, could be a sign of oil pressure issues related to a faulty cap.
- Oil Contamination: If the engine oil appears dirty or contaminated, it may be due to a compromised oil filler cap allowing dirt or moisture into the engine.
Maintenance and Prevention
Proper maintenance of the oil filler cap can help ensure its longevity and effectiveness:
- Regular Inspection: Check the oil filler cap and gasket for signs of wear, damage, or leakage during routine maintenance.
- Keep It Clean: Ensure the area around the oil filler neck is clean before removing the cap to prevent contaminants from entering the engine.
- Replace as Needed: Replace the oil filler cap if you notice any signs of damage, wear, or malfunction to maintain proper engine performance.
- Use the Correct Cap: Always use the correct oil filler cap specified by the vehicle manufacturer to ensure a proper fit and seal.
Replacement of the Oil Filler Cap
Replacing a faulty oil filler cap is a relatively simple task that can be done with minimal tools and expertise:
- Preparation:
- Tools and Materials: Gather a replacement oil filler cap that is compatible with your vehicle’s make and model.
- Safety Measures: Ensure the engine is cool before starting work to avoid burns from hot engine components.
- Remove the Old Cap:
- Locate the Cap: Find the oil filler cap on the engine. It is usually located on top of the engine and labeled with an oil can symbol.
- Remove the Cap: Twist the old cap counterclockwise to remove it from the oil filler neck.
- Install the New Cap:
- Position New Cap: Place the new oil filler cap onto the oil filler neck, ensuring it aligns properly.
- Secure the Cap: Twist the new cap clockwise until it is securely in place. Make sure it is tightly sealed to prevent leaks.
- Check for Leaks:
- Inspect: After installation, check around the oil filler neck and the engine for any signs of leaks or issues.
- Test Drive:
- Performance Check: Start the engine and drive the vehicle, monitoring for any unusual noises or issues related to oil pressure.
Follow us on Facebook for more parts.


