-29%
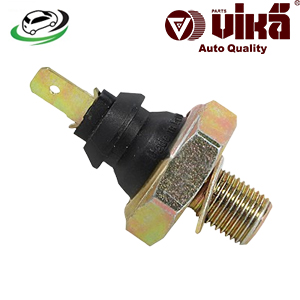
Get Oil Pressure Switch Audi B5 A4/C5 A6 / VW Corrado/Golf III/Jetta II/Jetta III/Passat B5 68919081
The oil pressure switch is a crucial component of an internal combustion engine’s lubrication system. It plays a vital role in monitoring the engine’s oil pressure and ensuring that it remains within a safe operating range. If the oil pressure drops below a certain threshold, the switch activates a warning light or gauge on the dashboard, alerting the driver to potential issues. This can help prevent serious engine damage caused by inadequate lubrication. In this overview, we’ll explore the design, function, importance, common issues, and maintenance of the oil pressure switch in detail.
Design and Function
Design:
- Materials:
- Housing: The oil pressure switch is typically housed in a metal or high-temperature plastic casing to protect it from the harsh conditions inside the engine bay, including heat, vibration, and exposure to oil.
- Diaphragm: Inside the switch, a diaphragm or piston responds to changes in oil pressure. This diaphragm is usually made of a durable, flexible material such as rubber or a composite that can withstand constant exposure to oil without degrading.
- Electrical Contacts: The switch contains electrical contacts that open or close in response to the diaphragm’s movement. These contacts are often made from copper or another conductive material to ensure reliable electrical connections.
- Structure:
- Threaded Connection: The oil pressure switch is typically threaded to fit into a port on the engine block, where it can directly sense the oil pressure. The threads ensure a secure, leak-proof connection.
- Electrical Connector: The switch has one or more electrical terminals that connect to the vehicle’s wiring harness. These terminals transmit signals to the dashboard light or oil pressure gauge.
Functionality:
- Monitoring Oil Pressure:
- Pressure Sensitivity: The oil pressure switch is designed to activate at a specific oil pressure level, usually between 3-7 psi (pounds per square inch). If the pressure drops below this threshold, the diaphragm inside the switch moves, causing the electrical contacts to change state.
- Signal Transmission: When the oil pressure is too low, the switch closes the circuit, sending a signal to the dashboard to illuminate the oil warning light. In some vehicles, the switch may also send a signal to an oil pressure gauge, providing a real-time display of oil pressure levels.
- Safety Mechanism:
- Engine Protection: The primary function of the oil pressure switch is to protect the engine by alerting the driver to low oil pressure conditions. Low oil pressure can lead to inadequate lubrication, causing increased friction, overheating, and ultimately engine failure.
- Preventing Catastrophic Failure: By providing an early warning of oil pressure problems, the switch allows the driver to take corrective action, such as stopping the engine or adding oil, before serious damage occurs.
Importance of the Oil Pressure Switch
- Engine Health:
- Lubrication Monitoring: The oil pressure switch ensures that the engine’s moving parts are properly lubricated. Adequate oil pressure is essential for maintaining a thin film of oil between engine components, reducing friction and wear.
- Preventing Damage: Low oil pressure can lead to insufficient lubrication, resulting in metal-to-metal contact, increased wear, and potential engine damage. The oil pressure switch helps prevent such issues by alerting the driver when oil pressure is too low.
- Driver Awareness:
- Warning System: The oil pressure switch is a key part of the vehicle’s warning system, providing an immediate alert if something goes wrong with the engine’s lubrication. This allows the driver to respond quickly and avoid further damage.
- Safety: By ensuring that the driver is aware of potential oil pressure problems, the switch contributes to overall vehicle safety. A properly functioning oil pressure switch can prevent breakdowns and costly repairs.
- Cost Savings:
- Preventive Maintenance: The oil pressure switch helps identify issues before they become serious, allowing for preventive maintenance. Addressing low oil pressure early can prevent expensive repairs and extend the life of the engine.
- Avoiding Engine Failure: Engine repairs or replacements are among the most costly automotive expenses. The oil pressure switch helps avoid these costs by providing an early warning of lubrication issues.
Common Issues with Oil Pressure Switches
- Wear and Tear:
- Aging: Over time, the oil pressure switch can wear out due to constant exposure to engine oil, heat, and vibrations. The diaphragm inside the switch may harden, crack, or lose its flexibility, leading to inaccurate readings.
- Electrical Contact Failure: The electrical contacts inside the switch can corrode or wear out over time, leading to poor conductivity or intermittent connections. This can cause the oil warning light to flicker or stay on even when oil pressure is normal.
- Leaks:
- Oil Leaks: One of the most common issues with oil pressure switches is oil leakage. The switch’s seals can degrade over time, allowing oil to seep out around the threads or through the switch itself. Oil leaks can lead to low oil levels and reduced pressure, compounding the problem.
- External Damage: Physical damage to the switch, such as cracks in the housing, can also cause leaks. This damage can occur due to improper installation, impact from road debris, or engine vibrations.
- False Warnings:
- Erroneous Signals: A malfunctioning oil pressure switch can send false signals to the dashboard, causing the oil warning light to illuminate even when there is no issue with the oil pressure. This can lead to unnecessary worry and, in some cases, unnecessary repairs.
- Inconsistent Readings: If the switch is failing, it may send inconsistent signals, causing the oil pressure gauge to fluctuate or display inaccurate readings. This makes it difficult for the driver to assess the actual condition of the engine’s lubrication system.
- Complete Failure:
- Non-Functioning Switch: In some cases, the oil pressure switch may fail completely, resulting in no signal being sent to the dashboard. This can be particularly dangerous, as the driver may not receive any warning of low oil pressure until it’s too late.
Maintenance and Inspection
- Regular Inspection:
- Visual Checks: Periodically inspect the oil pressure switch for signs of wear, leaks, or damage. Look for oil stains around the switch or on the engine block, as well as any visible cracks or corrosion on the housing.
- Dashboard Monitoring: Pay attention to the oil warning light or gauge on the dashboard. If the light flickers, stays on, or if the gauge shows erratic readings, it may indicate a problem with the oil pressure switch.
- Replacement Intervals:
- Follow Manufacturer’s Recommendations: Replace the oil pressure switch according to the vehicle manufacturer’s recommended intervals, or if any signs of wear or malfunction are detected. Regular replacement can prevent unexpected issues and ensure accurate monitoring of oil pressure.
- Check During Oil Changes: Inspect the oil pressure switch during routine oil changes, as this is an ideal time to check the overall condition of the engine’s lubrication system.
- Proper Installation:
- Use the Right Tools: When replacing the oil pressure switch, use the correct tools to avoid damaging the threads or housing. Over-tightening the switch can lead to cracks or leaks, while under-tightening can result in an insecure connection.
- Check for Leaks: After installing a new oil pressure switch, start the engine and check for any signs of oil leaks around the switch. If a leak is detected, ensure that the switch is properly seated and that the threads are not damaged.
- Monitor for Issues:
- Stay Alert: If you notice any unusual behavior from the oil pressure warning light or gauge, such as flickering, staying on, or fluctuating readings, have the oil pressure switch checked by a professional mechanic.
- Early Detection: Early detection of a failing oil pressure switch can prevent serious engine damage. Don’t ignore warning signs, and address any issues promptly to maintain engine health.
Replacing the Oil Pressure Switch
- Preparation:
- Gather Tools: Gather the necessary tools, including the replacement oil pressure switch, a wrench, and possibly a thread sealant. Refer to the vehicle’s service manual for specific instructions and tools required.
- Safety Precautions: Before replacing the oil pressure switch, ensure the engine is cool and disconnect the negative battery terminal to prevent any electrical accidents.
- Remove the Old Switch:
- Locate the Switch: The oil pressure switch is usually located on the engine block, near the oil filter or oil pan. Consult the service manual for the exact location in your vehicle.
- Disconnect the Wiring: Carefully disconnect the electrical connector from the oil pressure switch. Use a wrench to unscrew the switch from the engine block, being mindful of any oil that may leak out.
- Install the New Switch:
- Apply Thread Sealant: If recommended by the manufacturer, apply a small amount of thread sealant to the threads of the new oil pressure switch. This helps ensure a secure, leak-proof connection.
- Screw in the New Switch: Carefully screw the new oil pressure switch into the engine block, tightening it to the specified torque. Be careful not to over-tighten, as this can damage the switch or engine block.
- Reconnect and Test:
- Reconnect the Wiring: Reconnect the electrical connector to the new oil pressure switch, ensuring it is securely attached.
- Test the System: Reconnect the battery, start the engine, and check the dashboard for any oil pressure warnings. Monitor the area around the switch for any signs of oil leaks.
Follow us on Facebook for more parts.


