-12%
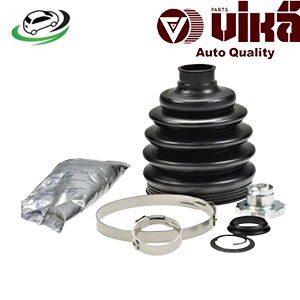
Get Outer CV Boot Kit AUDI A1 (8X1/8XK)-1.2/1.4 TFSI/ 1.6 TDI/ A1 Sportback (8XA/8XF)1.2/1.4 TFSI/A2 (8Z0) 6Q0498203A
A CV (Constant Velocity) boot kit is an essential component of a vehicle’s drivetrain, specifically designed to protect the CV joint. The CV joint itself is crucial for transferring power from the vehicle’s transmission to the wheels, allowing for smooth operation even as the wheels turn and the suspension moves. The boot is responsible for keeping the joint clean and lubricated, ensuring the longevity and proper functioning of the drivetrain. In this comprehensive guide, we’ll explore the anatomy of the CV boot kit, its importance, common issues, signs of failure, maintenance, and the replacement process.
Anatomy and Function of the CV Boot Kit
A CV boot kit typically includes several key components that work together to protect and maintain the CV joint:
- CV Boot: The main component of the kit is the boot itself, usually made from durable rubber or thermoplastic elastomer. It is designed to be flexible enough to accommodate the movement of the CV joint while sealing out contaminants.
- Grease: The kit includes high-quality grease specifically formulated for CV joints. This grease is crucial for reducing friction and wear within the joint, ensuring smooth operation.
- Clamps: Metal clamps are used to secure the boot to the CV joint and the axle. These clamps ensure that the boot stays in place, keeping the grease contained and contaminants out.
- Additional Components: Depending on the vehicle and the specific kit, there may be additional components such as washers, O-rings, or spacers that help ensure a proper fit and function.
Importance of the CV Boot
The CV boot plays a vital role in the overall health and longevity of the CV joint. Here’s why the CV boot is so important:
- Protection from Contaminants: The primary function of the CV boot is to protect the CV joint from dirt, debris, water, and other contaminants. If these particles enter the joint, they can cause significant wear and tear, leading to premature failure.
- Lubrication Containment: The CV boot also serves to contain the grease that lubricates the joint. Without proper lubrication, the metal components within the CV joint would grind against each other, leading to excessive wear and, eventually, failure.
- Preservation of Joint Integrity: By keeping contaminants out and grease in, the CV boot preserves the integrity of the joint, ensuring that it can continue to function properly over the long term. This is especially important in vehicles that are frequently exposed to harsh conditions, such as off-road driving or environments with a lot of road salt.
Common Issues with CV Boots
Despite being designed for durability, CV boots can suffer from several common issues over time:
- Cracking or Splitting: CV boots are made from flexible materials, but these materials can degrade over time due to exposure to heat, cold, road salt, and other environmental factors. Cracks or splits in the boot are common signs of wear.
- Tears from Debris: Road debris, such as sharp stones or metal fragments, can tear the CV boot. A torn boot is particularly problematic because it allows contaminants to enter the joint and grease to escape.
- Loose or Broken Clamps: The clamps that secure the CV boot can become loose or break over time, particularly if the vehicle is frequently driven on rough roads. A loose clamp can cause the boot to shift or detach, leading to grease leakage and contamination.
- Grease Leakage: If the boot is damaged or the clamps are loose, grease can leak out of the joint. Without adequate lubrication, the joint will wear out much more quickly, leading to potential failure.
Signs of a Failing CV Boot
Recognizing the signs of a failing CV boot is essential for preventing more serious damage to the CV joint and the drivetrain. Here are some common indicators:
- Grease on the Wheel or Under the Vehicle: One of the most noticeable signs of a failing CV boot is the presence of grease on the inside of the wheel, on the suspension components, or on the ground under the vehicle. This is a clear indication that the boot is damaged and grease is leaking out.
- Clicking or Popping Noises: If the CV boot is compromised and the joint becomes contaminated or loses lubrication, you may start to hear clicking or popping noises when turning the vehicle. This noise is often most pronounced when making sharp turns or accelerating.
- Vibration While Driving: A damaged CV boot can lead to an imbalance in the CV joint, which can cause vibrations that are felt in the steering wheel or the vehicle’s body, particularly at higher speeds.
- Visible Damage to the Boot: During a visual inspection, any signs of cracks, splits, or tears in the CV boot should be taken seriously. Even small cracks can lead to more significant issues if not addressed.
- Excessive Play in the CV Joint: If the CV joint develops too much play or movement, it’s a sign that the joint is worn out, likely due to a damaged boot. This can be checked during a routine inspection by a mechanic.
Maintenance and Inspection of CV Boots
Regular maintenance and inspection of CV boots are crucial for preventing more severe damage to the drivetrain. Here’s how to keep your CV boots in good condition:
- Regular Visual Inspections: During routine vehicle maintenance, it’s important to visually inspect the CV boots for any signs of damage. This includes checking for cracks, tears, or grease leaks.
- Monitoring for Noises: Pay attention to any unusual noises while driving, especially when turning. Clicking or popping noises can be an early warning sign of CV joint issues.
- Check for Grease Leaks: Regularly check for signs of grease leakage around the wheels or under the vehicle. Grease on the wheel or suspension components is a clear indicator that the CV boot may be damaged.
- Replace Boots at the First Sign of Damage: If you notice any damage to a CV boot, it’s essential to replace it immediately. Waiting too long can lead to more serious and costly damage to the CV joint.
Replacing a CV Boot
Replacing a CV boot can be a complex task, but it’s necessary to prevent further damage to the CV joint. Here’s a general overview of the replacement process:
- Preparation: Lift the vehicle safely and remove the wheel to access the CV joint. Make sure you have the appropriate tools and a replacement CV boot kit ready.
- Remove the Old Boot: Loosen the clamps and carefully cut away the old, damaged boot. Be cautious not to damage the CV joint itself during this process.
- Clean the CV Joint: Thoroughly clean the CV joint, removing any old grease, dirt, or contaminants. Inspect the joint for any signs of wear or damage.
- Apply New Grease: Use the grease provided in the kit to re-lubricate the CV joint. It’s important to apply the grease evenly and use the entire amount included to ensure proper lubrication.
- Install the New Boot: Slide the new boot over the CV joint and axle, ensuring it fits snugly. Secure it in place with the clamps provided in the kit.
- Reassemble the Suspension: Reattach the wheel and lower the vehicle back to the ground. Ensure all components are securely fastened.
- Test Drive: After replacing the CV boot, take the vehicle for a test drive to ensure everything is functioning correctly. Listen for any unusual noises and check for any signs of grease leakage.
Follow us on Facebook for more parts.


