-10%
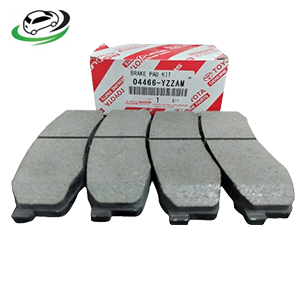
Get Toyota Land Cruiser 75/80/ Prado 95/120/150 Rear Brake Pad Kit 04466-YZZAM
The rear brake pad kit is an essential component of a vehicle’s braking system, responsible for providing the necessary friction to slow down and stop the vehicle. This kit typically includes brake pads, hardware, and sometimes additional components needed for a complete replacement. This article explores the function, materials, design features, common issues, replacement process, and maintenance of the rear brake pad kit.
Function and Importance
The primary function of the rear brake pad kit is to convert kinetic energy into thermal energy through friction, allowing the vehicle to decelerate or come to a complete stop. This is crucial for vehicle safety and performance. Key roles include:
- Friction Generation: Brake pads press against the brake rotors to create the friction needed to slow down or stop the vehicle.
- Heat Dissipation: Efficiently dissipate the heat generated during braking to prevent overheating and maintain braking performance.
- Durability and Longevity: Provide consistent braking performance over time while withstanding high temperatures and mechanical stress.
Materials
Rear brake pads are made from materials designed to offer optimal performance, durability, and safety. Common materials include:
- Organic (Non-Asbestos Organic – NAO): Made from fibers, resins, and fillers, these pads are quieter and produce less dust but may wear faster and perform less effectively under high temperatures.
- Semi-Metallic: Composed of metal fibers, these pads offer good performance and heat dissipation but can be noisier and produce more dust.
- Ceramic: Made from ceramic fibers and other nonmetallic materials, ceramic pads provide excellent performance, low dust, and noise levels, and are highly durable.
- Low-Metallic NAO: A blend of organic materials and small amounts of metal, these pads offer a balance of performance, noise reduction, and durability.
Design Features
Rear brake pad kits often include several design features to enhance performance and ease of installation:
- Chamfered Edges: Reduce noise and vibration by smoothing the pad’s contact with the rotor.
- Slotted Pads: Help to remove dust and debris, improve heat dissipation, and prevent glazing.
- Shims and Insulators: Reduce noise and vibration, providing a quieter braking experience.
- Wear Indicators: Visual or audible indicators that signal when the brake pads need replacement.
Common Issues
Over time, brake pads can develop issues due to wear and tear, leading to compromised braking performance:
- Noise: Squealing or grinding noises may indicate worn pads or issues with the rotor surface.
- Reduced Braking Efficiency: Increased stopping distances or a spongy brake pedal can signal worn-out pads or air in the brake lines.
- Vibration: Vibration or pulsation when braking can be caused by unevenly worn pads or warped rotors.
- Brake Dust: Excessive brake dust on wheels can be a sign of deteriorating brake pads.
Replacement Process
Replacing the rear brake pad kit is a critical maintenance task that ensures the continued safety and performance of the braking system:
- Preparation: Park the vehicle on a level surface and engage the parking brake. Gather the necessary tools and the replacement brake pad kit. Loosen the lug nuts on the rear wheels.
- Lifting the Vehicle: Use a jack to lift the rear of the vehicle and secure it with jack stands. Remove the rear wheels.
- Removing the Old Pads: Locate the brake caliper and remove it using the appropriate tools. Secure the caliper to avoid stress on the brake hose. Remove the old brake pads and any hardware.
- Inspecting Components: Check the brake rotors for wear and damage. If needed, have them resurfaced or replaced. Inspect the caliper and other components for signs of wear or damage.
- Installing New Pads: Apply brake lubricant to the contact points on the caliper and the new pads. Install the new pads and any new hardware included in the kit.
- Reassembling: Reattach the caliper and ensure all bolts are tightened to manufacturer specifications. Repeat the process for the other side.
- Testing: Before driving, pump the brake pedal to ensure proper pad seating. Check for any signs of fluid leakage or abnormal noise. Test drive the vehicle to ensure the brakes are functioning correctly.
Maintenance
Proper maintenance can extend the life of the rear brake pad kit and ensure consistent braking performance:
- Regular Inspections: Periodically inspect the brake pads, rotors, and calipers for signs of wear or damage.
- Timely Replacement: Replace brake pads when they reach the wear limit or show signs of deterioration.
- Brake Fluid Maintenance: Regularly check and replace brake fluid as needed to ensure optimal braking performance.
- Driving Habits: Practice smooth and controlled braking to reduce excessive wear on the brake pads.
Follow us on Facebook for more parts.


