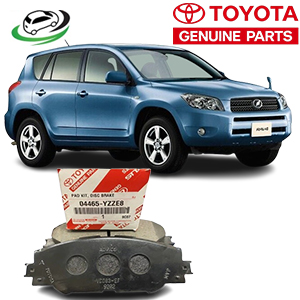
Get Toyota Rav4 ACA30 Front Brake Pad Kit 04465-YZZE8
The front brake pad kit is an essential component of a vehicle’s braking system, crucial for safety and performance. Brake pads provide the friction necessary to slow down or stop the vehicle effectively. Understanding the components, functions, types, installation, maintenance, and indicators of wear related to front brake pads is vital for vehicle owners and automotive professionals alike.
1. The Importance of Brake Pads
1.1 Function
Brake pads work in conjunction with the brake rotors to create the necessary friction that slows down the vehicle when the brake pedal is pressed. When the driver applies the brakes, hydraulic pressure from the master cylinder forces the brake calipers to clamp the brake pads against the rotors, generating friction.
1.2 Safety
The importance of brake pads cannot be overstated. They play a critical role in the vehicle’s ability to stop efficiently. Worn or damaged brake pads can lead to decreased braking performance, increasing stopping distances and risking accidents.
2. Components of a Front Brake Pad Kit
A typical front brake pad kit consists of several essential components designed to ensure optimal braking performance:
2.1 Brake Pads
The primary components of the kit, brake pads are available in various materials and configurations to suit different vehicle types and driving conditions. The choice of material affects the pad’s performance, lifespan, and noise levels.
2.2 Shims
Shims are thin layers made of materials that help reduce noise and vibrations between the brake pads and calipers. They ensure smooth operation and enhance braking efficiency.
2.3 Anti-Rattle Clips
These clips secure the brake pads in place, preventing unwanted movement and minimizing noise during braking. Anti-rattle clips are often included in brake pad kits for easy installation.
2.4 Installation Hardware
Many kits come with installation hardware, such as bolts and clips, that are necessary for mounting the brake pads. Having the correct hardware ensures a secure fit and proper function.
2.5 Installation Instructions
Most brake pad kits include detailed instructions for installation, making it easier for both professional mechanics and DIY enthusiasts to replace the pads correctly.
3. Types of Brake Pads
Brake pads come in several types, each designed for specific applications and performance characteristics:
3.1 Organic Brake Pads
Made from composite materials like rubber, glass, and resins, organic brake pads provide good stopping power and are relatively quiet. They are suitable for everyday driving but may wear out faster than other types.
3.2 Semi-Metallic Brake Pads
These pads consist of metal fibers mixed with other materials, offering better heat dissipation and increased stopping power. Semi-metallic pads are ideal for heavier vehicles and performance applications, although they may produce more noise and rotor wear.
3.3 Ceramic Brake Pads
Ceramic brake pads are composed of ceramic fibers and materials, providing excellent stopping power, lower dust production, and quieter operation. They are suitable for high-performance vehicles and everyday driving.
3.4 Performance Brake Pads
Designed for high-performance vehicles and racing, these pads feature aggressive friction materials that provide superior stopping power and heat resistance. However, they may generate more dust and noise than other types.
4. Signs of Worn Brake Pads
Recognizing the signs of worn brake pads is crucial for maintaining vehicle safety and performance. Common indicators include:
4.1 Squeaking or Squealing Noises
A high-pitched squeaking sound when applying the brakes is often a sign that the brake pads are worn and need replacement. Many brake pads are designed with wear indicators that produce these sounds as a warning.
4.2 Grinding Noises
If grinding noises are heard while braking, it may indicate that the brake pads are worn down to the metal backing, potentially damaging the rotors. Immediate replacement is necessary to prevent further issues.
4.3 Reduced Braking Performance
A noticeable decrease in braking responsiveness or an extended stopping distance may suggest worn brake pads that require inspection and replacement.
4.4 Vibration or Pulsation
Feeling vibrations or pulsations through the brake pedal while braking can signal uneven wear on the brake pads or warped rotors, necessitating immediate inspection.
4.5 Warning Lights
Some modern vehicles are equipped with dashboard warning lights that illuminate when brake pad wear is detected. Drivers should address any issues indicated by these lights promptly.
5. Installation of Front Brake Pads
Replacing front brake pads is a straightforward process that can be accomplished with basic mechanical skills and tools. Here’s a step-by-step guide for installing a front brake pad kit:
5.1 Gather Tools and Materials
To replace the brake pads, you will need the following tools and materials:
- Floor jack and jack stands
- Lug wrench
- Ratchet and socket set
- C-clamp or brake pad tool
- New brake pad kit (including shims and hardware)
- Brake cleaner
5.2 Raise the Vehicle
- Park the Vehicle: Ensure the vehicle is on a level surface and engage the parking brake.
- Lift the Vehicle: Use the floor jack to raise the front of the vehicle and secure it with jack stands.
5.3 Remove the Wheel
- Loosen Lug Nuts: Use the lug wrench to loosen and remove the lug nuts.
- Take Off the Wheel: Carefully remove the wheel to access the brake components.
5.4 Remove the Brake Caliper
- Locate Caliper Mounting Bolts: Remove the bolts securing the caliper to the bracket using a ratchet and socket.
- Lift Off the Caliper: Carefully lift the caliper off the brake rotor. Avoid straining the brake line and support the caliper with a bungee cord or rope.
5.5 Remove the Old Brake Pads
- Slide Out Old Brake Pads: Remove the old brake pads from the caliper bracket.
- Inspect the Rotor: Check the rotor for wear or damage. Resurfacing or replacing the rotor may be necessary if it is uneven or excessively worn.
5.6 Install New Brake Pads
- Clean the Rotor: Apply brake cleaner to the rotor and wipe it clean to remove contaminants.
- Install New Pads: Slide the new brake pads into the caliper bracket, ensuring they are correctly oriented.
5.7 Compress the Caliper Piston
- Use a C-Clamp or Tool: Compress the caliper piston back into the caliper housing, creating space for the new, thicker brake pads.
- Ensure Full Retraction: Confirm that the piston is fully retracted before reinstalling the caliper.
5.8 Reinstall the Brake Caliper
- Position the Caliper: Carefully position the caliper over the new brake pads and align it with the mounting bracket.
- Reattach Caliper Bolts: Tighten the caliper mounting bolts to the manufacturer’s specifications.
5.9 Reinstall the Wheel
- Place the Wheel: Reattach the wheel to the hub and hand-tighten the lug nuts.
- Lower the Vehicle: Lower the vehicle and use the lug wrench to tighten the lug nuts to the specified torque.
5.10 Test the Brakes
- Pump the Brake Pedal: Before driving, pump the brake pedal several times to ensure the pads are seated correctly and the brake fluid is distributed.
- Conduct a Test Drive: Perform a test drive at low speeds to verify proper brake function before returning to normal driving.
6. Maintenance of Front Brake Pads
Proper maintenance of front brake pads is essential for ensuring optimal performance and extending their lifespan. Here are some best practices:
6.1 Regular Inspections
Routine inspections of the brake system should be part of regular vehicle maintenance. Check the brake pads for wear and examine the rotors and calipers for signs of damage or corrosion.
6.2 Keeping the Brake System Clean
Dirt and debris can accumulate on brake components, affecting performance. Regularly clean the brake calipers, rotors, and pads to prevent contamination and maintain optimal operation.
6.3 Avoiding Excessive Heat
Frequent hard braking generates excessive heat, leading to brake fade and reduced performance. Drive smoothly and avoid aggressive driving habits that can contribute to overheating.
6.4 Using Quality Parts
When replacing brake pads, choose high-quality components that meet or exceed OEM specifications to ensure reliability and safety.
6.5 Replacing in Pairs
When replacing brake pads, always replace them in pairs (front or rear) to maintain balanced braking performance. Replacing only one side can lead to uneven braking and compromised safety.
Conclusion
The front brake pad kit is a crucial component of the braking system, directly impacting vehicle safety and performance. Understanding its functions, types, construction, maintenance, and signs of wear can help ensure that your vehicle’s braking system operates effectively. Regular inspections, timely replacements, and proper maintenance are key to achieving optimal braking performance and ensuring a safe driving experience. By following the guidelines outlined in this comprehensive overview, vehicle owners and automotive professionals can maintain the integrity and reliability of front brake pad kits, contributing to overall road safety.
Follow us on Facebook for more parts.


Reviews
Clear filtersThere are no reviews yet.